


Manually adding new products to WooCommerce can be tedious, especially when dealing with a large number of items. To facilitate bulk product imports, WooCommerce offers built-in functionality for importing and exporting CSV files containing product data. In this article, I will explain the process of adding products in bulk to your online store and introduce more advanced concepts regarding the import of products with variations. By properly automating this process, you can add numerous products to your store or modify the parameters of individual items in no time.
You can export your products to a CSV file and use that same format to upload new products or update existing ones. If you have no prior experience with CSV files, don’t worry—it is always a good time to learn something new.
What is a CSV file and how do you open it?
A CSV file is one in which the columns in each row are separated by commas. The acronym stands for “Comma-Separated Values.” You can open a CSV file using virtually any spreadsheet program or directly in Notepad. If you do not have a program on your computer capable of opening the file, you can upload it to Google Sheets. Spreadsheet programs available on the market differ in terms of functionality. For instance, Microsoft Excel does not format the file in a human-readable way by default; this differs from Google Sheets (web), Numbers (iOS), and LibreOffice (Windows, iOS), where the file is automatically formatted upon opening.
How do I format a file in Microsoft Excel?
To format the file in Microsoft Excel, open it, select the first column of the worksheet (e.g., column A), go to the “Data” tab at the top, and click “Text to Columns.” Clicking this button opens a window where you can specify the file formatting details. In the configuration window, you can choose a separator and adjust other settings; for this purpose, simply setting the separator to a comma is sufficient. Next, click “Next” twice; the file’s content should then shift from plain text to the standard spreadsheet layout of columns and rows. Remember to select the entire column A, not just cell A1; otherwise, you will split only the values in the first row.
How do you format the file in other programs?
As indicated above, file formatting and splitting values based on a separator usually happen automatically. If your program did not format the file automatically, consult the program’s documentation—look for “splitting columns using a separator.”
How do I download my products to a CSV file?
The first step is, of course, to log in to the administration panel; go to the admin dashboard and then navigate to Products > All Products. Once on the products page, you will see all currently added products; to download them in CSV format, click the “Export” button located next to the page title.

The following window will then appear:

In this step, you can select which columns to export; I recommend preparing a new product list based on this selection. It is best not to export every column from the file, but rather only those you actually need. Columns that may prove useful when adding new products include ID, TYPE, SKU, NAME, DESCRIPTION, SHORT DESCRIPTION, PRICE, and CATEGORIES. If your store includes products with variations, or if WooCommerce manages your inventory, it is also worth exporting additional columns such as PARENT, IN STOCK, and STOCK QUANTITY. If your theme uses additional custom fields that you populate, these should also appear as selectable options in the list.
The next field concerns the product type; we can choose to download only products of a specific type—for example, only products with variants. The final field allows for the selection of one or more product categories.
For demonstration purposes, I have chosen to export only four columns: ID, TYPE, NAME, SHORT DESCRIPTION, and PRICE:

You will notice that each product is automatically assigned an ID code by the system. In WooCommerce, you can also add an SKU, which serves as another unique product identifier; having either the ID or the SKU is necessary for updating a product. If the file you are uploading is missing either of these fields, a new product will be created, and an ID code will be assigned automatically.
How do I add my products to the store using CSV?
By downloading previously added products, we already know the file structure and which data fields need to be populated based on the existing products and their values in the CSV file. As for the rows currently in the file, it is up to you whether to remove them or keep them and add only new items. Personally, I prefer—and recommend—the second approach: removing the old data. Here is what the three new products look like:
I added new rows after first removing the previous data. We leave the ID column blank because we want WordPress to automatically assign an ID number to the new products. We then save the prepared list as a CSV file, return to the products tab, and click the Import button.

In the first field, select the saved CSV file; in the next field, you can choose to have WordPress update only existing products—meaning any product with an ID or SKU not currently found in the store’s inventory will be skipped. After clicking “Continue,” you will proceed to the next step, and—provided you have done everything correctly so far—a window like this should appear:
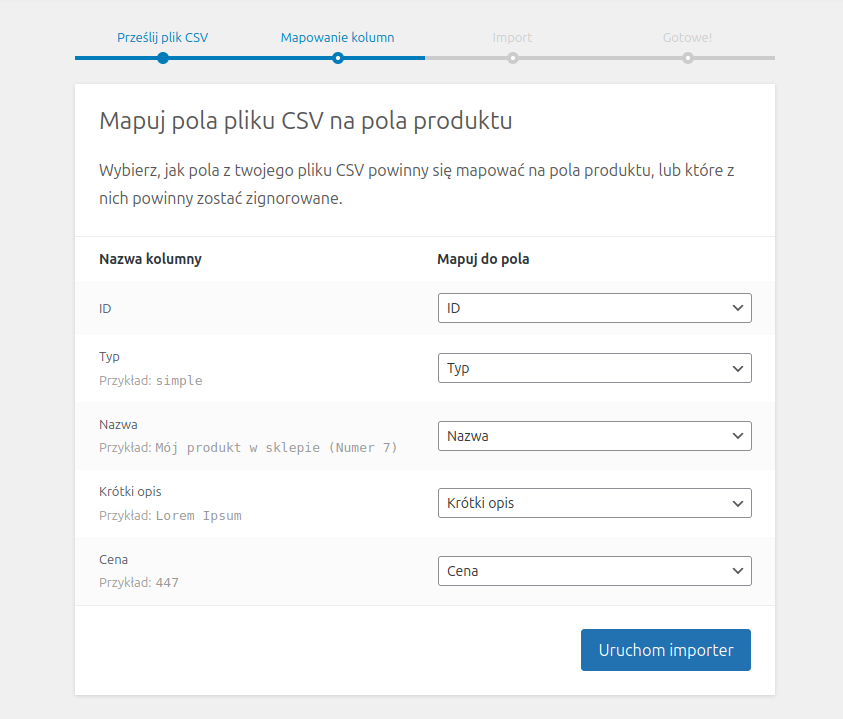
Before adding new products using the importer, be sure to back up the site.
WooCommerce will automatically suggest mappings between the columns in your file and the fields available in the store. If you use a previously exported file, WooCommerce will have no trouble identifying the correct columns. The process becomes more complex if you have named the columns in your file arbitrarily; in that case, you will need to manually match each field. At this stage, you can also preview a single record from your file to verify that the columns have been correctly matched. The final step is to run the importer, a process that—depending on the number of records—will take anywhere from several dozen seconds to a few minutes.
How do I add multiple products and their variants in bulk?
Adding multiple new products with variants is possible using the same method, though the process requires additional configuration. The specific adjustments depend on the variant attributes; our portfolio includes tools that automatically generate variants for an unlimited number of products, allowing you to easily create and add products—along with their variants—to your store. If you are looking for ready-made solutions for the bulk addition of products with variants, please contact us to check out our solution.
