

This article will show you how to add Google Apps Script to your spreadsheet. To get started with Google Apps Script, all you need is a Google account and access to Google Sheets. I’ll begin by discussing the history of Apps Script and briefly discussing some sample tasks you can use Apps Script for.
Short history
Google Apps Script is a platform that allows you to write programs based on the JavaScript language. Apps Script is designed to create small applications based on the Google infrastructure. Using Apps Script, you can access most tools, for example, create documents in Google Sheets and place them in appropriate folders on Google Drive. The main goal of Google Apps Script was to enable users to automate various tasks. In March 2020, a new application engine was introduced: the V8 JS runtime, which now provides users with full support for JavaScript.
What can I create with Google Apps Script?
Google Apps Script allows you to add your own functionality to Google tools—such as Google Sheets, Google Docs, Google Forms, etc. You must program additional functionality yourself using JavaScript and the functions available within the Google environment. With Apps Script, you can automate many processes within your company. If you frequently hire employees, you can create, for example, a contract generator.
Another example – if you pay your employees on a commission basis, you can create a salary calculator that will send a statement to each employee at the beginning of the month with a summary of their earnings.
Below you will find examples of projects that we have created based on Google AppScript for our clients:
- Serial generation of a statement of hours for a mandate contract.
- A tool for monitoring events in the vehicle fleet (oil services, technical inspections, etc.) – a tool integrated with GPS and email.
- Taxi driver salary calculator.
- Serial generation of mileage allowances for the Tax Office based on GPS reports.
- A tool for monitoring employee work time integrated with an Electron-based application.
- Analysis of data (sales funnel) from the Bitrix system – data is downloaded automatically.
First script
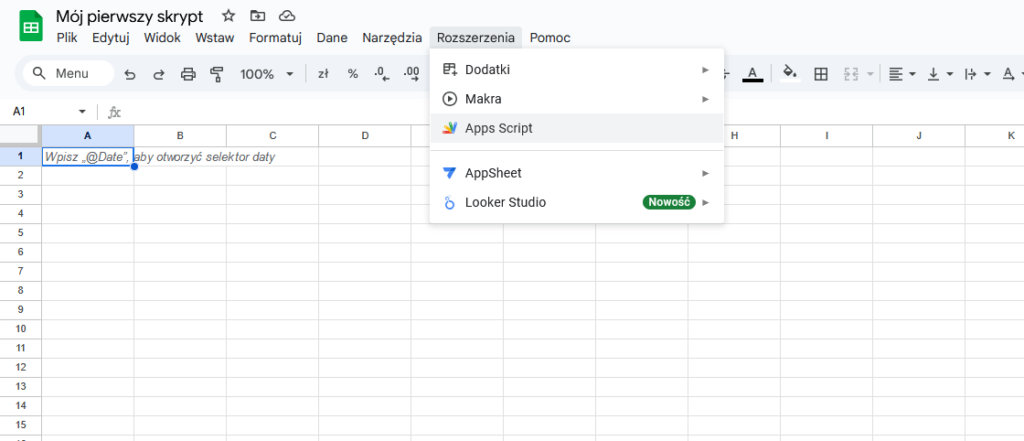
To create your first Google Apps Script, you’ll need to create a new file in Google Sheets. Once the file is created, enter a name for it and go to the Extensions menu item, then click Apps Script.
In our first script, we will add data to our main sheet, display an alert, and add the function we created to the menu.
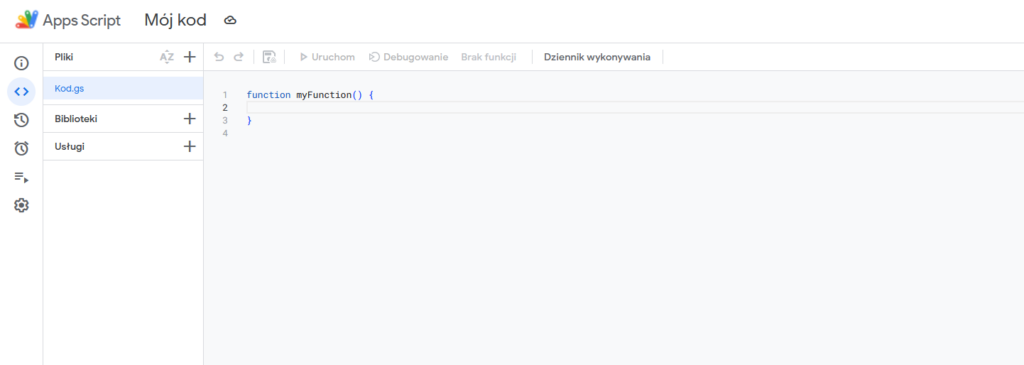
Once you’re in the Apps Script editor, give your program a name. In my case, I simply entered “My Code,” but it can be anything you want. As for the layout, the menu on the left, from the top down, includes: Overview, Editor, Project History, Rules, Runs, and Project Settings. I’ll try to write a separate post with more information about these individual menu items.
For now, let’s focus on the code, go to the editor if you’re elsewhere and see what we have here by default:
function myFunction(){
}
// you can use arrow function if you want
const myFunction = () => {
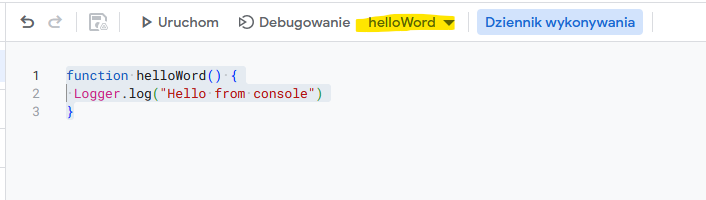
}By default, the file contains a single function added by the system, called myFunction. This is simply a JavaScript function. Typically, the first code written in a new environment is some simple console.log, and that’s what we’ll do here.
function helloWord() {
 Logger.log("Hello from console")
}
Because this is JavaScript available in a Google-created engine, we don’t have access to the native console.log() function. Instead, we use the dedicated Logger.log() function to debug elements. To run the function, you need to click the Run button at the top of the menu, making sure the appropriate function is selected.
After pressing Run, a debugger window should appear at the bottom and you should see the following output:
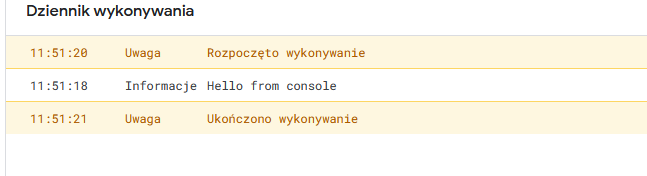
As you can see, the execution log provides information at the beginning and end of the script’s execution time. The maximum script runtime currently is 6 minutes. There’s a workaround for this limit, but I’ll cover that in a separate post.
How to enter data using a script?
Let’s enter the data of 10 employees at once into the active sheet, starting in the first empty row. Add the following code:
const employeeData = [
  { name: "Jan Kowalski", phone: "555-444-333", branch: "workshop" },
  { name: "Anna Nowak", phone: "555-333-222", branch: "sale" },
  { name: "Piotr Zieliński", phone: "555-222-111", branch: "workshop" },
  { name: "Maria Wiśniewska", phone: "555-111-000", branch: "workshop" },
  { name: "Tomasz Wójcik", phone: "555-666-777", branch: "workshop" },
  { name: "Ewa Kaczmarek", phone: "555-777-888", branch: "workshop" },
  { name: "Krzysztof Lewandowski", phone: "555-888-999", branch: "sale" },
  { name: "Agnieszka Dąbrowska", phone: "555-999-000", branch: "sale" },
  { name: "Michał Woźniak", phone: "555-000-111", branch: "workshop" },
  { name: "Zofia Mazur", phone: "555-123-456", branch: "sale" }
];


function addValuesToRows() {
 const sheet = SpreadsheetApp.getActiveSpreadsheet().getActiveSheet();
 employeeData.forEach((employee) => {
 sheet.appendRow([employee.name, employee.phone, employee.branch])
 })
}
Before running this code for the first time, you’ll be asked to authorize the script. This message appears because we’ve added a new feature that uses Google Drive resources. To proceed, go to Advanced and agree to the script’s execution. You’ll need to authorize it each time you create a new spreadsheet and add Google Apps Script to it.
In the code above, we add a constant named employeeData and a function called addValuesToRows, which will add records to our active sheet. You’re probably wondering what the active sheet is at this point? It’s simply the sheet you currently have open in the file as a user:

Let’s add our function to the menu
To add our function directly to the spreadsheet menu, we need to add a short code that allows the user to run the function. It’s worth noting that the onOpen function is available within our script and, by default, runs whenever the user opens a file. After adding this code and updating it, you can go to your spreadsheet and refresh it. A moment after opening it, a new menu item called Extra Functions should appear.
function onOpen(){
    const ui = SpreadsheetApp.getUi();
    ui.createMenu("Extra funkcje")
    .addItem("Dodaj rekordy", "addValuesToRows")
    .addToUi();
}
Code optimization
A much more recommended approach to selecting sheets is to use another method, such as sheet name or ID. If we were to select the sheet by name, we would simply use another method provided by Google Apps Script:
function addValuesToRows() {
 const sheet = SpreadsheetApp.getActiveSpreadsheet().getSheetByName("Dane pracowników");
 employeeData.forEach((employee) => {
 sheet.appendRow([employee.name, employee.phone, employee.branch])
 })
}
Note that you must provide a valid sheet name in the getSheetByName parameter, otherwise an error will occur and the script will terminate. For proper function operation, it is recommended to use try…catch blocks.
If we’re working on fixes, the data storage in our function also leaves something to be desired – it’s better to save data in Google Apps Script in batches rather than individually, line by line. So let’s fix our code and save all employees at once to the first available line.
